So, for anyone who's noticed-it's been a while since I've posted anything. First, I've been SUPER busy getting everything ready for the upcoming Three Speckled Hens show. And I still have tons to do! On top of that My computer power supply went out on me a couple weeks ago & I still haven't replaced it.....soon though! Just wanted to do a quick post so that everyone knew what was up. Thanks to Alisha for letting me use the IPad to post this (and Kevin too!)I should be back on track soon!

Wednesday, May 11, 2011

Sunday, April 17, 2011
French Grain Sack Chair Before and After


I bought this little chair at a yard sale, it was part of the typical 60's little girls French Provincial knockoff furniture that I think almost every girl had a piece of at one time or another. It was sturdy enough but the boring cream & gold paint was chipping off & tweed & metallic thread fabric on the seat was in bad shape.
I sanded it down then did a dry brush treatment with two different shades of gray paint I had on hand. I started with an uneven coat of the dark gray, again, dry brushing so that the coverage was pretty good but not solid (you could still see the original paint showing through in some spots). Next I did the same thing with the lighter gray, focusing on the areas where the original cream still showed through. After both these dried I did a final dry brush with Valspar's Asphaltum glaze & just worked it in unevenly. All of it was sealed with two coats of Minwax Polycrylic
The seat fabric was replaced with solid ticking in a unbleached natural color that I hand painted a "French grain sack" style design on with some black fabric paint I picked up at Micheal's for a couple bucks. I washed it after it dried so it had that old faded look to it like an actual grain sack would. It also softens the paint up a little. This chair is available at the Revamped Boutique inside Reminisce in downtown Paso Robles.

I'm linking this post to the following parties;

Tuesday, April 5, 2011
Dream Closet Makeover Ingredients
 |
| decorpad |
Lately I've really been wanting to use grays & whites somewhere in my house, I love the combination of these two classic colors when they're mixed with deep rich wood tones & a little sparkle (think mirrors or chandelier crystals). However that said, this style goes with nothing in the Mediterranean design scheme were working towards throughout the rest of the house. So where could I use this without it looking out of place? Somewhere that wouldn't necessarily matter if it didn't hold hands with the rest of the color schemes in our home? It would have to be a room all to itself.........I do need to redo my closet organization system......and If I'm going to repaint the best time to do it would be when everything is already taken out, like you would need to if you were putting in a new closet system, hmm....
 |
| colorindesign.net |
These bold vertical stripes are a great design trick for making a space appear to have higher ceilings, which would be great in my "walk in" closet which is really more of a squeeze in closet. For some reason the ceilings in my closet are lower than they are in my bedroom. So this paint treatment might be a good option for me.
 |
| goodgirlgoneglad.com |
 |
| comfortandluxury.blogspot.com |
Every closet needs ample room for stiletto storage, right? When we bought our house the previous owners had some built in shelves installed but they're not very efficient, for me at least. The spaces between each self are at least a foot & a half, probably good for what they were intended for - folded clothes. That's what dressers are for. I'm planning on adding a few so that they can be re-spaced appropriately for heels, and a couple for boots too. What I love about this set up is the back lighting on each shelf, it's like a shoe gallery.
 |
| worldinapapercup.wordpress.com |
What I love about this organization system is that it looks so nice & neat but look at how much is packed in there! This is what I need, and there's even additional shoe storage at the bottom!
 |
| Nieman Marcus |
Of course, if Im going to make all these cool changes to my closet then I'll need to make sure there's enough lighting to notice them all. In my mini space one of these mini chandeliers would work perfectly! If you can't have a grand scale you should at least have grand style.
 |
| thisnext.com |
And lastly, what good is a closet with no mirror? This awesome gold carve frame would really stand out against a cool gray paint treatment. It would also give my boyfriend a chance to try out the new router table his mom just got! He has been anxious to use it.......It would be so cute with a little tufted footstool with curved legs sitting in front of it.
So what do you think of this color scheme? Cool gray with white accents and gold leaf finishes on the huge mirror & mini chandelier, all anchored by dark rich wood shelving? I think I need to get to work!
Linking up to

Linking up to
Friday, March 25, 2011
Shutter Memo Board

These are a pair of shutters I picked up at my local Habitat for Humanity ReStore for a couple bucks. They were in pretty bad shape, the arm that opened & closed the slats was disconnected at one end on one shutter & the other was just kind of banged up. I didn't need these to function as shutters so that part didn't matter to me & it helped when I asked if they would take a few bucks for both!

Next I opened the slats (like shown on the shutter at the right) & hit each one with a couple good coats of Krylon's Aqua in a satin finish. After that dried I heavily brushed on Valspar's Asphaltum glaze then removed the excess with a damp paper towel, followed by a couple coats of spray polyurethane. After the entire finishing process was complete, I cut a section of cream colored burlap to the same length & width of the slat section of each shutter. I don't have a picture of this but all I did to apply it was run a bead of hot glue along the top of each slat on the side with the arm then press the burlap into place. This kept the slats from opening & also created a barrier on the backside to prevent mail/papers from falling through. I finished the back side off with a saw tooth hanger on either side to hang it from.

Here it is finished, not the best picture but you get the idea. It could also be used for organizing mail or displaying snapshots.
Sunday, March 20, 2011
"French Grain Sack" Pillows

I love all the French grain sack pillows I've been seeing everywhere lately. There's some beautiful antique grain sacks that are still in excellent shape, & some awesome reproductions at reasonable prices, I decided to try to come up with some of my own. This one with the double blue stripe is my favorite. The blue looks A LOT brighter in these pictures, in person it's a faded looking medium blue.

Here's a few others from the second set I made, the first ones came out really nice & sold so fast that I didn't even have a chance to get pictures!

I also used this design on one of the first pillows I did, this is from something else that I'll be revealing later this week (make sure to check back for that). I made covers out of both solid ticking & burlap then painted them with acrylic (the red & blue) & fabric (black) paints. The acrylic seemed to work just as well as the fabric paint so if you're wanting to try this project on your own, don't spend the extra money on fabric paint. It might last better in the long run for something that will be washed regularly, but for pillows I wouldn't worry about it. After the paint dried I washed them on a cold gentle cycle so that it faded in certain spots, giving it a more realistic "vintage grain sack"appearance.

Here they are in my boutique displayed with the leftovers from my first group. They're staged on a French farmhouse style daybed I did in a weathered gray finish, I will also be doing a post on this later this week.
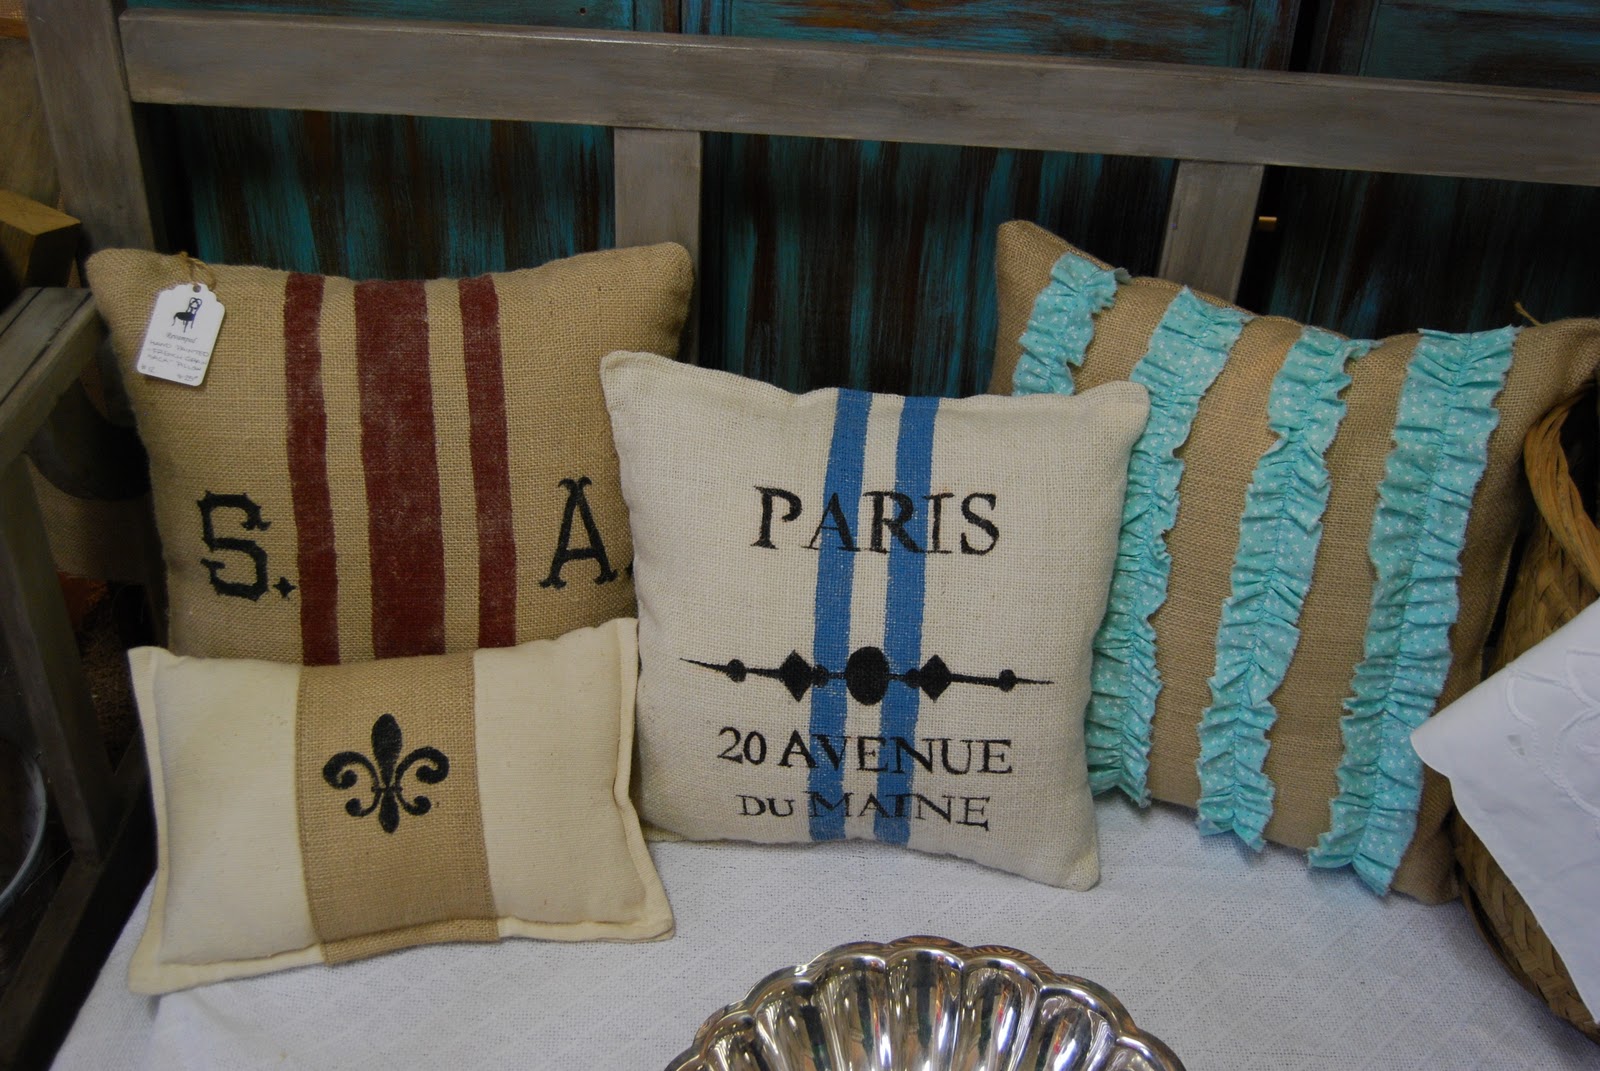
Here's a closer shot so you can see the details.

And the last two, stacked in a basket with a scalloped edge vintage white table cloth. These have been moving fast so there will probably be more to come.
Im linking up to the following blog parties, use the links below to check out all the other awesome entries

Im linking up to the following blog parties, use the links below to check out all the other awesome entries
Tuesday, March 15, 2011
The Numbered Drawer Dresser

This is the poor little dresser that could. My mom bought this when I was born at an unfinished furniture store and stained it a dark walnut then sealed it. It stayed this way, being handed down through my siblings until my first daughter was born. I painted it a bright aqua to fit in with her room in my very first apartment. After that it went back to my moms house where it was painted this basic white & was used in her guest room. After re-decorating the guest room she didn't need it any more & gave it back to me so I could refinish it once more then sell it. My boyfriend had already started sanding the top when I remembered to take this picture.

This isn't the greatest shot but it shows the condition it was in before I started the refinishing process (this of course wasn't how it looked when it was used in my mom's guest room, but after it had been sitting in my garage for a LOOONG time). Although I have no need for it at all I feel kind of bad selling it after it's been in the family for so long.

Here it is with it's new finish, I LOVE how it turned out! I had mentioned to several people that I was going to re-paint it & number the drawers & no one seemed to think it was a good idea. In fact, even after showing her similar pictures on line, my best friend tried to talk me out of it. I'm glad I decided to trust my instincts & go with it anyway. The paint is a blend of about 3 different colors I had on hand, the cream is a Color Place (Walmart) paint called Butter Cookie that I also had on hand. I mixed black & beige acrylic paints to get the gray I used on the numbers. The edges were lightly distressed by hand using 80 grit sandpaper & then the whole piece was lightly glazed with Valspar's Mocha. A couple coats of Minwax Polycrylic gave it a good seal & add durability.

I lined the insides of the drawers with a printed kraft paper that had a vintagey (is that a word?) look to it. I actually found this in the gift wrap section at the Dollar Tree! It's perfect for use as drawer liners because its a heavier weight & just gives a fresh look to a vintage piece of furniture.

Here's a closer shot of the numbered drawers. The numbers look like they're graduated in size but it's actually just the angle the picture was taken from.

This one shows the distressing a little better, I think it adds to the vintage style of this dresser. I'm also loving these "crystal" acrylic pulls I got from another Reminisce vendor (Vicky) they're perfect for adding just enough sparkle & only $2.65 ea! You can't beat that price (I've looked)! I mentioned before that everyone I told about my idea for this wasn't convinced, almost every person I told said, "Oh, like for a kids room:?". Which would be fitting, but I think this could also be great in an adults room, or storage in a larger bathroom. It is kinda girly, but I think if balanced out with some more rustic dark woods or maybe even industrial metal accents it could definitely work. What do you think? I'd love some feedback on this.
Im linking up to the following link parties;
Maryann over at Domestically Speaking was nice enough to put me in the Power of Paint Party spotlight! Thanks Maryann ; )

Im linking up to the following link parties;
Maryann over at Domestically Speaking was nice enough to put me in the Power of Paint Party spotlight! Thanks Maryann ; )
Tuesday, March 8, 2011
More Items at the Revamped Boutique

Most of my posts are about furniture or accessory pieces I've re-done, so I thought I'd include some of the items in this one that were just good finds that I also have for sale. These pale blue vintage cordial glasses are a larger set of 9 and are in perfect condition. They're really pretty in person with just that little bit of a sky blue glow.

I had a hard time bringing this Italian soup tureen down to the store, I make lots of soups & this would be so perfect with my new white dish set. But after considering that I would probably find this being used in my 2 1/2 yr. old's play kitchen I decided that it might have a longer life in someone elses home.

I love this lantern, this was another piece I had to convince myself that I didn't need to keep. It has an aged bronze finish & looks good here with the fruit but even better with a couple creamy colored pillar candles, like I have it staged in the boutique. It would be perfect on an outdoor dining table.

I picked up this aquamarine glass bottle at an estate sale, I passed up a clear one just like it. Now I wish I hadn't because I had barely set it on this desk to display before someone came up & said they wanted it. I hadn't even put the price on it yet!

This set of 5 white Ironstone appetizer plates has a delicate scrolled detail around the scalloped edge & would also make a good addition to my new white plate set. Sometimes I think I subconsciously shop for myself while I'm buying for the store. Probably another reason I love my job so much!

And another item I want to buy from myself, this vintage white rusted bird cage. It has such a pretty shape, & it's hard to tell in these pics but the 3 doors have a scrolled detail above each one. After I took this picture I put a faux forsythia branch with little yellow blossoms inside to add some color, it looks so cute! You could even do a live potted plant or candles, anything really. Because the entire top of the cage lifts off the base, there's a wide range of accents or accessories that would fit in here.
At the end of my first three weeks I had already sold my Verdigris Dresser, the Old World Buffet, & LOTS of smaller accessories & decor items. I definitely exceeded my own expectations! Which is great, but I hadn't expected these items to move so fast & it left me hurrying to get more pieces finished. Right now Im working on a smaller dresser & French Provincial style nightstand to accent a French farmhouse style daybed I already have in my space. I'll be covering those items in an upcoming post for those of you that haven't or can't see them in person.
Subscribe to:
Posts (Atom)