Thursday, June 16, 2011

Louvered Bi-Fold Doors Turned Patinaed Shutters


I always like having shutters in my boutique so anytime I find a pair at one of my "sources" I usually pick them up. Unfortunatley for me, the ones I find don't usually look so great the way that I find them. But with a little paint & glaze or wax they can be easily transformed to look like they have a weathered finish that came from years of use.


I couldn't find a before shot of this pair so this picture of a similar pair will have to do. The finish on mine was a little darker than these the other difference was that mine had solid panels on the bottom half.


Here's what mine look like after a sparse dry brushing with some turquoise paint I picked up at Re-Store, as you can see I just went right over the hinges & everything. It takes A LOT longer to paint the louvered section by hand than if you were spraying it but to achieve this finish it's nessecary. I chose to let a good amount of the original wood finish show through (which looks really red in these shots).


After the paint dried I brushed a chocolate color glaze over the top to age them out & finished them with Minwax's clear Finishing Wax Paste - looking back I wish I would've used a brown wax to add to the patinaed look.


Here they are leaned up behind my French Farmhouse Daybed in my boutique. If you're a frequent Revamped reader you've probably seen these in the background of a few other shots. Although they were put on layaway shortly after I brought them in, the customer didn't pick them up right away so I got to show them off in my space a little bit longer. I have to say, they were pretty hard to photograph because of the louvered section & actually looked a lot better in person.


I had to throw my favorite picture with the shutters in. My three year old Olivia always sneaks in to the shot whenever she sees me take out the camera to get pictures of my work. If were up to her she would be the only thing I took pictures of, look at what a little poser she is! She knows she's cute!


I have a few more that I'm getting ready to finish & am looking for a few new ideas for how to display and or re-purpose them. Have any of you seen any good uses for these? I'd love some feedback!


Linking up to the following parties;


Thursday, June 9, 2011

New Blog in the Making

Just a quick late night post to let you know that I just published the first post at my new blog called Pennies and Paint where my best friend Cameron & I will chronicle the makeover of her second home, a California condo. We will be performing a top to bottom remodel with little to no budget. So, if you're a homeowner or would just like to see how you can get in on some afordable design for your own home, follow us at the link above! Once on the Pennies & Paint blog you can choose to "subscribe" on the menu at the top. Thanks for your support!

Wednesday, June 8, 2011

Dumpster Dive Turned Frenchy Memo Board


Ok so I didn't actually dumpster dive. My mom works downtown Paso Robles next to a really high end interior design company that was closing. She walked by one day as they were putting all this cool stuff out by the dumpster. They told her she could take any of it, so I got a caned French settee (Perfectly finished too! Crazy!), some huge curtain rod dowels, some cabinet doors, & this frame.


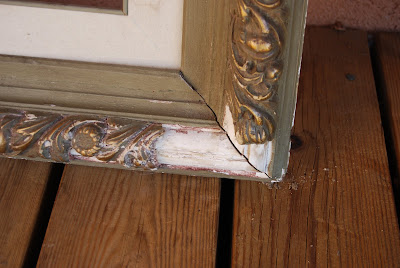
It's an olive green & gold vintage plaster relief frame that was in poor shape. The plaster had broken off in a couple spots. I knew it could be something awesome though. I took it home & shot a couple heavy duty staples into it to re-inforce the corner joints & gave it a couple good coats of Rustoleum's Heirloom White.


To give it some depth I blended about a 60 to 40 mix of Valspar's Mocha & Asphaltum glazes then worked it into all the nooks and crannies and let it sit for about 15 minutes until the glaze felt tacky. I lightly wiped & blotted it with a damp paper towel until I got the finish I was looking for. Which was an antiqued cream with chocolate accents. After spraying it with a clear sealer (I think it was Valspar's in satin) finish, I stapled chicken wire to the back of the frame & covered the rough edges with a 2 in. wide strip of burlap "ribbon"


Here it is hanging in my shop with a few memos clipped to it.


And a close up to show the details in the finish. This one was literally a trash to treasure project! I have to say it came out pretty cute & sold within a couple of days!


Linking to the following parties;


Friday, June 3, 2011

Anyone Interested In Some Free Stuff?

IT'S ALL YOURS!!!

If you can prove to me that you want it. I want to hold a giveaway contest but last time I tried this I didn't get one taker......not one! Talk about a slap in the face, I don't know if I just wasn't offering something cool enough, or what the problem was.

So this time I'm letting you decide, all you have to do is;

  1. Become a follower (if you're not already)
2. Sign up to recieve e-mail notifications, even if you're already a follower

3.Leave a comment on this post telling me that you want a giveaway & what you think it should be!


That's it, three easy steps to a prize of your choice.....or should I say of your influence?
Im REALLY hoping to get some feedback this time around! The more responses the better the prize! Show me what you've got!

Thursday, June 2, 2011

French Farmhouse Daybed & How Morro Bay Cabinets saved my butt!


First & foremost I have to give a HUGE thank you to Steve at Morro Bay Cabinets in Paso Robles, CA. I realized when I started working on this bed, that I was missing the entire front leg piece on one side, did I mention that I HAD to have this bed finished by the next morning to fill the huge empty space in my boutique? It was about 5:00 pm when I drove as fast as I could over to their show room hoping I could get someone to help me with a replacement. I remembered that they had done some work for my mom years ago & it came out beautifully. Not only do they not do this kind of work, (should've been obvious by the name!) but they close at 4:00! Luckily I caught Steve on his way out the door, & explained what I needed, (it probably helped that he was a friend if a friend too). He was able to find a scrap piece of wood that he cut to match the bed frame EXACTLY! He even went as far as filling the screw holes with wood putty for me! And the whole time he worked on it he told me I could go check out their showroom (which is awesome by the way). In the less than ten minutes it took him to do this for me I had already designed my dream kitchen. When I asked what I owed him he just smiled & said "Nothin." Where else can you get service like that?!!! I wasn't even a paying customer & he went out of his way to help me! I guess that's one of the many reasons they've been in business since 1974, along with the fact that they do beautiful work. So, thank you Steve! You saved my butt & I really wouldn't have been able to get this done without you!

ON TO THE DAYBED........
A while back I bought a trundle for my for daughter's daybed on Craigslist. The guy selling it gave me a pretty good price, there was one catch - it came with a hideous 1980's oak & brass daybed frame. He said he would not break up the set. So I became the owner of this shabby 80's mess. I took a before pic but I can't find it anywhere, allthough the above daybed is pretty rough lookin, it's nowhere compared to mine & doesn't include the (fake I might add) brass trim. But it will have to serve as my "before" on this one.

I started by pulling the plastic brass trim out of the grooves that ran across the tops & fronts of the two side pieces of the frame. Once that was done the bed had really nothing to it, it was a very simple design & the frame was pretty open. It definitely needed something to give it some personality.

 I decided to go with a layered dry brush technique I've been using a lot lately. I gave the original finish a light sanding then brushed my first coat of gray (I used the darker of the two I had on hand but you could definitely do it the other way around) on very haphazardly so that the coverage was inconsistent & some of the oak still showed through. After that had dried completely I applied the second coat (using the lighter shade of gray) in the same manner, focusing on covering the areas where the oak showed through. The final coat was a dry brush of Valspar's Asphaltum glaze which I worked in to the paint using my chip brush. It all got sealed up with a couple coats of Polycrylic.

 Even with the antiqued gray finish I still felt like it needed something so I picked up a two pack of these carved wood medallions of at Lowes for around five or six bucks. I used some Gorilla Glue (only a few dots) & a nail in the center of the flower to affix them to the bed & then brushed a light silver over them so they stood out a little.


I tried to get a closer shot of the finish here but it didn't come out so great. Also, notice the two grooves that formerly held the plastic brass racing stripes....a big improvement once it was removed.


 This chair was done using the same technique & colors as the French Farmhouse daybed but I opted to let a little of the original white finish show through , this should give you a little better idea of how the daybed finish came out.


And here it is all staged in my boutique with some of the grainsack pillows I also made. Im sure it would look even better with a mattress, a crisp white duvet cover & some pillows (maybe grainsack style?). Unfortunately it's no longer available, it actually sold a week or two after I put it in my space. If you like this finish I currently have an antique vanity that was done with the same colors & crystal knobs, post on that coming soon!