Sunday, February 20, 2011

Moss Monograms

When  I found these wooden letters at Goodwill I already new what I wanted to do with them. They were painted navy & gold & had glue all over the backs of them. One of them someone had even tried to make & the wood had splits all over it, they were just nasty. But I got seven of them for two dollars. My friend Melissa had made a really cute monogram for her last name that she covered in moss, I had always wanted to try making one but since my boyfriend & I aren't married, & my older daughter has a different last name, I would've had to make three different ones for our house! So until now, I haven't really been able to do it. I thought since there were several different letters to work with, these would be good for my boutique space.

 Because they were so gross looking on the back I decided that in order to look nice enough for people to buy, I needed to clean them up. So I sprayed the back a tan color I had on hand & did the fronts in green - in case there were any tiny spots that showed through the moss.
 Here's how they came out. I also covered over the tan paint on the back with burlap then attached saw tooth hangers with hot glue. I used these to tie each end of a cream grosgrain ribbon through. I don't have a shot of the back but it's pretty self explanatory.
The moss I used came in sheets , I put the letters face down on the back of the moss sheet then traced around them with a Sharpie. After cutting them out I hot glued them to the front of the letters & then cut thin strips to finish off the sides. I thought covering the outside edges would be a total pain in the butt. It actually wasn't bad, the moss is pretty forgiving. I finished three of these to hang in my boutique &  have already sold one. The others will be finished up & joining these ones at the Revamped boutique soon.

Wednesday, February 16, 2011

French or Faux?

I picked up this buffet as part of a two piece hutch set on Craigslist. I decided that I could make two more interesting pieces by separating them. It obviously needed some serious painting but I wasn't sure exactly what I wanted to do so I Googled "painted buffet" to see if I could get some inspiration. Of everything that came up I narrowed it down to these pieces.

I love the simple details on this antique buffet that the people over at Dancing Through Paris actually had shipped over from Paris along with a container full of other awesome finds from their buying trip. I wish!

I like the rough look of the layers of paint showing through in different areas, it looks like it's been passed down through generations, getting a different look from each new owner.

This buffet is from the same source as the one before, but has a less complex finish. This is closer to what I was looking to do with mine. Antique looking but not overdone.
I hate not being able to give credit but I cant find the source for this buffet / bakers cabinet. This has more of a mass produced look to me but still has the basic color & finish I was going for just with a little less detail. It also has the same top that I liked (the piece I had was damaged on top so I knew I was going to need to replace it).

Here's what mine looks like "after", not the greatest lighting in this shot but you get the general idea. I started with Krylon's paint for plastic in Dove White, and applied probably about 4 light coats for good coverage. Next I blended two colors from interior latex paints I had on hand, one was a dark cream & the other a very light taupe. I sparsely dry brushed one layer of each over the entire buffet. Once that had dried I blended together my Valspar glazes in Mocha (about 60%) & Asphaltum (about 40%) so that I had a dark chocolate color glaze. I used a brush to work it into all the crevices then immediately removed it with a damp paper towel. After the glaze had dried I sealed it with Minwax's Polycrylic for durability. The door handles are original, they were an unusual size so it would've been tough to find a decent replacement. Plus, I liked the bulkiness of them, they looked like they could be heavy forged iron, except they were brass. So I gave them each a couple shots of flat black spray paint & finished with a flat sealer.


Before & after shot of the doors, what a difference, huh? I forgot to mention that I also went over all the raised areas & edges with a 60 grit sandpaper before glazing.

This is the new top my boyfriend put on, we just picked up a piece of pine shelving at Lowe's. He screwed in in place then I finished it with Varethane gel stain in walnut & sealed it with the Minwax Polycrylic.

Just a last side by side before & after

Tuesday, February 15, 2011

Not So Pretty in Pink

This desk is the result of a late night Craigslist mission my boyfriend & I
went on. I just happened to check the "free" section right after this was posted,
luckily the guy who posted it was a total night owl like me. I e-mailed & he
responded right away saying to come pick it up that night (I obviously wouldn't
have gone by myself to do this).The guy was actually really cool & told me
that he got this desk from CL himself years ago, & that it was an antique.
He didn't have any use for it anymore & wanted to pass it on to someone else.
After I saw the pic he posted, I Googled "wicker & wood desk" to see if I
could get ideas of what it could look like. Which is what made me decide to go get it!

Here's what it looks like after a surprisingly quick makeover, such an
improvement! All it took was some serious sanding to the top, & about 4 cans
of Krylon's Heirloom White spray paint. I also re glued the wicker ends in some
places with a high-temp hot glue gun before painting.
The drawer was pretty banged up but it still had the original hardware on it
which I originally thought I'd change, but with the darker stain on the drawer I
like how the glass knob keeps it light & adds some sparkle to the front.
After sanding the drawer down I could tell that the drawer front was made
of teak wood, an unusual choice but after seeing this I decided to stain rather than
paint it. This shot is pretty blurry but you can still see what a huge difference
there is between the before and after - notice the "hold" tag hanging form the knob. The
desk had only been in my boutique for two days!
This is a close up of the library sides (shelves built into the side of the desk to hold
books, etc.) They were covered in veneer that was cracked peeling up. My boyfriend
actually took a hammer & flat head screwdriver & gently chipped this up, which to my
surprise ended up looking a lot better.
Here's the after shot, it looks like they must've used different types of wood
for the planks because on moth sides the stain took more on some pieces than
others, creating an almost striped effect.
This is the top, definitely the worst part of the desk. It doesn't look as bad here
but the veneer here had started to peel off & left huge jagged strips really rough
spots that someone had just painted over (when we sanded we also found a
layer of metallic gold paint-I don't know why but I kind of like that idea!).
The really surprising part is, that once we started sanding it all came up & was
actually really smooth.
This is the closest after shot I have of the desk top, I used Varethane's gel
stain in walnut. You can see closer pics in the background of my last post
here. I can't believe what a huge difference some sanding & spray paint can make .
Hopefully this little antique desk will be around for a lot longer now.

Monday, February 14, 2011

First Round of Revamped Inventory


These are just few of the items I have available for sale
in my new retail space. This distressed green chalkboard
was an old oak cabinet door that I sanded down & then
primed & painted with chalkboard paint.

This old chippy door was so cool, the weathered varnish had
more of a golden color in person, it had a ton character. It would look
great in a living room, leaned up against a wall as backdrop for an
armchair or something. Someone else liked it as much as I did, it was my first item to sell!


This is an adorable white cotton matelasse coverlet in a twin size. It was a
total score, in perfect condition - no spots, holes or any defects at all!

A close up of the same coverlet. Here you can see some of the detail in
the raised white on white design.

When I picked up this basket it was cute, but there was nothing special about
it. Just an aged looking off white weave. I hand painted a French grain sack
inspired design in a cool gray.

I love this old wooden crate, it could be used for anything but I have
it staged here as an outdoor entertaining caddy. You could also tuck in an
old canning jar to hold your antique silver flatware, cloth napkins or tea towels.
Or even a few little dishes with crostini, olives & mini cheese wedges. The vintage
seltzer bottle & antique style glass goblets are also available for purchase.

This end of the box is embossed with a Napa Valley logo.

This little table top birdbath / feeder is a great little piece to add color to an
outdoor space. It's perfect for use as a birdbath because the glazed top will
hold water without being absorbed. It would great for a small courtyard or balcony.

This little apothecary terrarium has such a great shape to it, I filled it with polished
pea gravel & faux moss covered stones, This no maintenance accessory would be
perfect for an office desktop or bathroom shelf.

I just thought these little winged wooden hearts were fun. I found them
in the craft section. I painted the centers in chalkboard paint then decorated
the wings in different colors & finished them off with a stick of chalk
tied at the base.

I can't remember whether I've already shown this in a post or not. I
actually picked up this super cute little picture frame at Goodwill with
the antiqued finish already on it. All I did was prime & paint the glass with
chalkboard spray paint (I have a lot more chalkboard items now then I would
normally plan to).


These are the items I wanted to highlight, the ones I really
want to keep for myself
!


My mom actually picked up this cute little footed silver bowl for me.
I just added this moss ball "topiary" for some interest.

I am IN LOVE with this vintage style locker basket! I want to keep it so bad but
before I opened I made a deal with myself that I had to be able to part with
all these cool things unless I really had a need for them (otherwise I'd be headed
for the next episode of hoarders). I have to give a "thank you" to Kathy at the Paso
Robles Habitat for Humanity ReStore for hooking me up with the basket which was
cool on its own, but it needed a little something extra to make it stand out. After
looking at Michaels' selection of tags & not really finding anything I liked, I
decided to D.I.Y. it or H.M.B.D.I.H. (Have My Boyfriend Do It Himself). ; ) We
found a scrap of molding we had laying around that he cut to the same
length as the handle opening then drilled a hole in either end. I finished it of
with, what else? Chalkboard spray paint & some jute twine to attach it
to the basket.
This is definitely one of the coolest silver pieces I've ever found. I like the
shiny silver finish against the jagged edges of the center bowl. I don't know what
the heck you would put in a bowl surrounded by candle holders though, I like
the idea of a bird's nest but that's probably a fire hazard. I'm thinking about taking
it back for myself!


And lastly, this vintage seltzer bottle. It has such a pretty embossed design around
the base. I entertain a lot & this would be perfect for chilling sun tea in for serving on
the patio. I kind of cheated on this one though, when bought this I also picked up
an antique French lemonade bottle with a similar design that will be staying at my house!

All the items in this post are available at Reminisce on 14th & Pine Streets in
downtown Paso Robles (except for the chippy door which has already sold). If
you're out of the area & would like to purchase one
of the things you see here you can contact me through my blog & I'll
have it shipped for you.

Thursday, February 10, 2011

French Provincial Nursery Rocking Chair

You might remember a few weeks back when I did the post on my friend's daughter's French Provincial nursery furniture. Well, I wasn't able to finish the rocking chair in time for her to take it back home with her. So when I got the call that she was in labor & headed to the hospital, I figured it was probably a good time to start on the upholstery!


When Heather & I started looking for a good rocking chair for her we both agreed that the upholstered ones were a must for comfort, considering the amount of time she'd spend in it. She just didn't want to go with one of those ugly gliders. I saw this hot mess at my local ReStore & didn't really pay much attention at first. After a second glance I realized it had perfect lines to go with the French Provincial style she was going for, the upholstery didn't look like it would be impossible, & it was an antique.
Here it is after, yes that's my front porch it's on - like I said, Heather was in the hospital & at this point had already had the baby. So the chair was out front waiting to be picked up by her step-father-in-law (if that makes sense) who was on his way to see baby Madalyn.
You can't really tell in these pictures but the fabric was a linen color that complemented the white frame really well. It's also complimentary to the fabric she picked out for the bedding (which I will also be making & sharing in a later post).

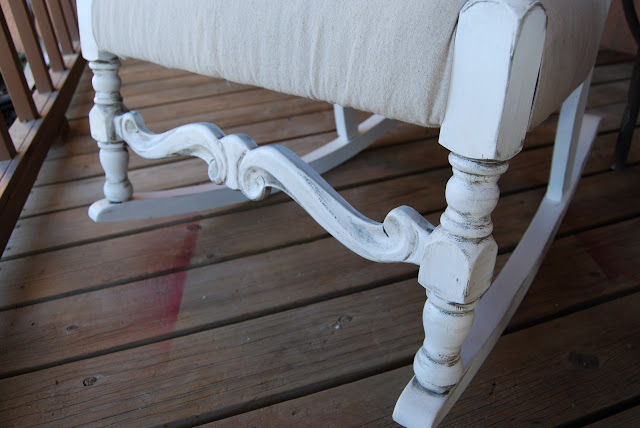
This is my favorite part of the chair, the frame had such pretty details.

The wood frame was painted in a satin white that Heather had color matched to the crib she had ordered. I Antiqued it with Valspar's Asphaltum glaze (this is beginning to be a pattern) to highlight the turned legs & carved pieces.

The carving added enough detail to accent the other curved lines of the chair but was simple enough that it didn't look fussy.


Nice legs


Im also linking this up to, you guessed it - Miss Mustard Seed's Copy Me Challenge. I figured if any of these projects say MMS it's definitely one with a distressed white frame & linen colored upholstery.


Copy Me Challenge

Wednesday, February 9, 2011

Verdigris Highboy Dresser


So, here's my first large piece available for sale at my retail location. This dresser has come a long way from how it came to me. It was a nasty 80's glossy cherry finish with brass hardware, but it was also built solid with dovetail drawer joints & dust trays (not a huge deal but stuff you don't usually see on new furniture). I painted it a soft celery green that I blended myself then went over it with about a 60/40 blend of Valspar's Mocha & Asphaltum glazes. This produced a dark rich chocolate colored glaze. I primed then spray painted the two "locks" with Krylons Oil Rubbed Bronze, all the other hardware was new from Lowe's also in an ORB finish. The pain in the butt about that was that the top drawers had holes drilled 2.5 in. apart for the hardware & the bottom drawers were spaced for 3 in. pulls - wish I would've measured BEFORE hand. Just about the only kind of hardware I could find without having to special order were cup pulls, the bottom two drawers were easy. All hardware (except the decorative "locks") are by Amerock.


This is what it looked like before, actually not in bad condition but it looks like it belongs to a cranberry & hunter green color floral print love seat - makes my stomach hurt! I do love the curved lines on the feet though & the other subtle details lend interest without looking overdone.


Here's a before shot of the embossed detail on the upper section of the dresser.


Here it is after highlighted with some of that chocolate glaze & new ORB hardware.


And one last shot, showing some of the detailed lines.


I'm linking this up to Miss Mustard Seed's "Copy Me Challenge" , for any of you that aren't familiar with her, use the button below to check out her website, it's been a great tool for me in a lot of the recent projects I've been working on. She has lots of helpful tutorials & even a series on starting a business. Anytime I have a random furniture or business question (or just need some inspiration) I can usually find whatever I'm looking for on her blog. Although about 95% of the projects that are linked up to her "Copy Me Challenge" Are distressed white - a MMS standard, I feel like it's all kind of predictable......Miss Mustard Seed is anything but predictable. So, I thought I would enter something that identifies with the washed out antique colors that she mixes in with her whites.


Copy Me  Challenge


Anyone interested in purchasing this dresser can contact me through then link on the right hand side of my blog, I can get a quote for shipping & Revamped Home Furnishings now accepts all major credit cards.


I'm also linking up to the following link parties


Funky Junk's Saturday Nite Special